This Blog contains recipes, thoughts, whats cooking at home and mostly things related to Bar-B-Que. Come on in, look around & read up on my
"Bar-B-Que Adventures"

Sunday, April 11, 2010

Bacon Cheddar Turtle Burger


Today was a beautiful day here in Nebraska. Sunny & 71 degrees, after cleaning up the leftover leaves in the yard & trimming the roses i decided to do a little practice run on the Egg for an upcoming event here in town. I found these burger`s while surfing the Smokering Forum & thought what a novel idea. This burger just might win the contest. So....
What they are is a bacon wrapped burger with hot dog pieces sectioned for the legs, tail and head. First off make a bacon weave with 5-6 strips of thin cut bacon as such. 6 strips of bacon makes a jumbo sized burger so you might have to use less bacon. Your cardiologist would agree.

Next place a slice of sharp cheddar cheese(lower melting point) on the bacon. Make a hamburger patty to your liking seasoned as you wish. Then fold up the bacon ends over what will be the bottom of the patty. Carefully flip the bacon wrapped patty over onto a piece of tinfoil.

Cut up some Hebrew National hot dogs or any hot dog that you like as long as its a skinless hot dog. Cut the legs to two inches and the head to about three inches long. Cut one for the tail trimming to a point. Insert limbs between the bacon weaves on the sides of the burger to simulate a turtle. Cut 1/4 inch slits in the leg ends to simulate the webbed toes of a turtle, these will fan out while cooking.

While this is not a difficult task, it does require a bit of patience. Fasten the limbs with tooth picks to hold it together while cooking. When finished cooking remove the toothpicks the limbs will stay in place for plating.
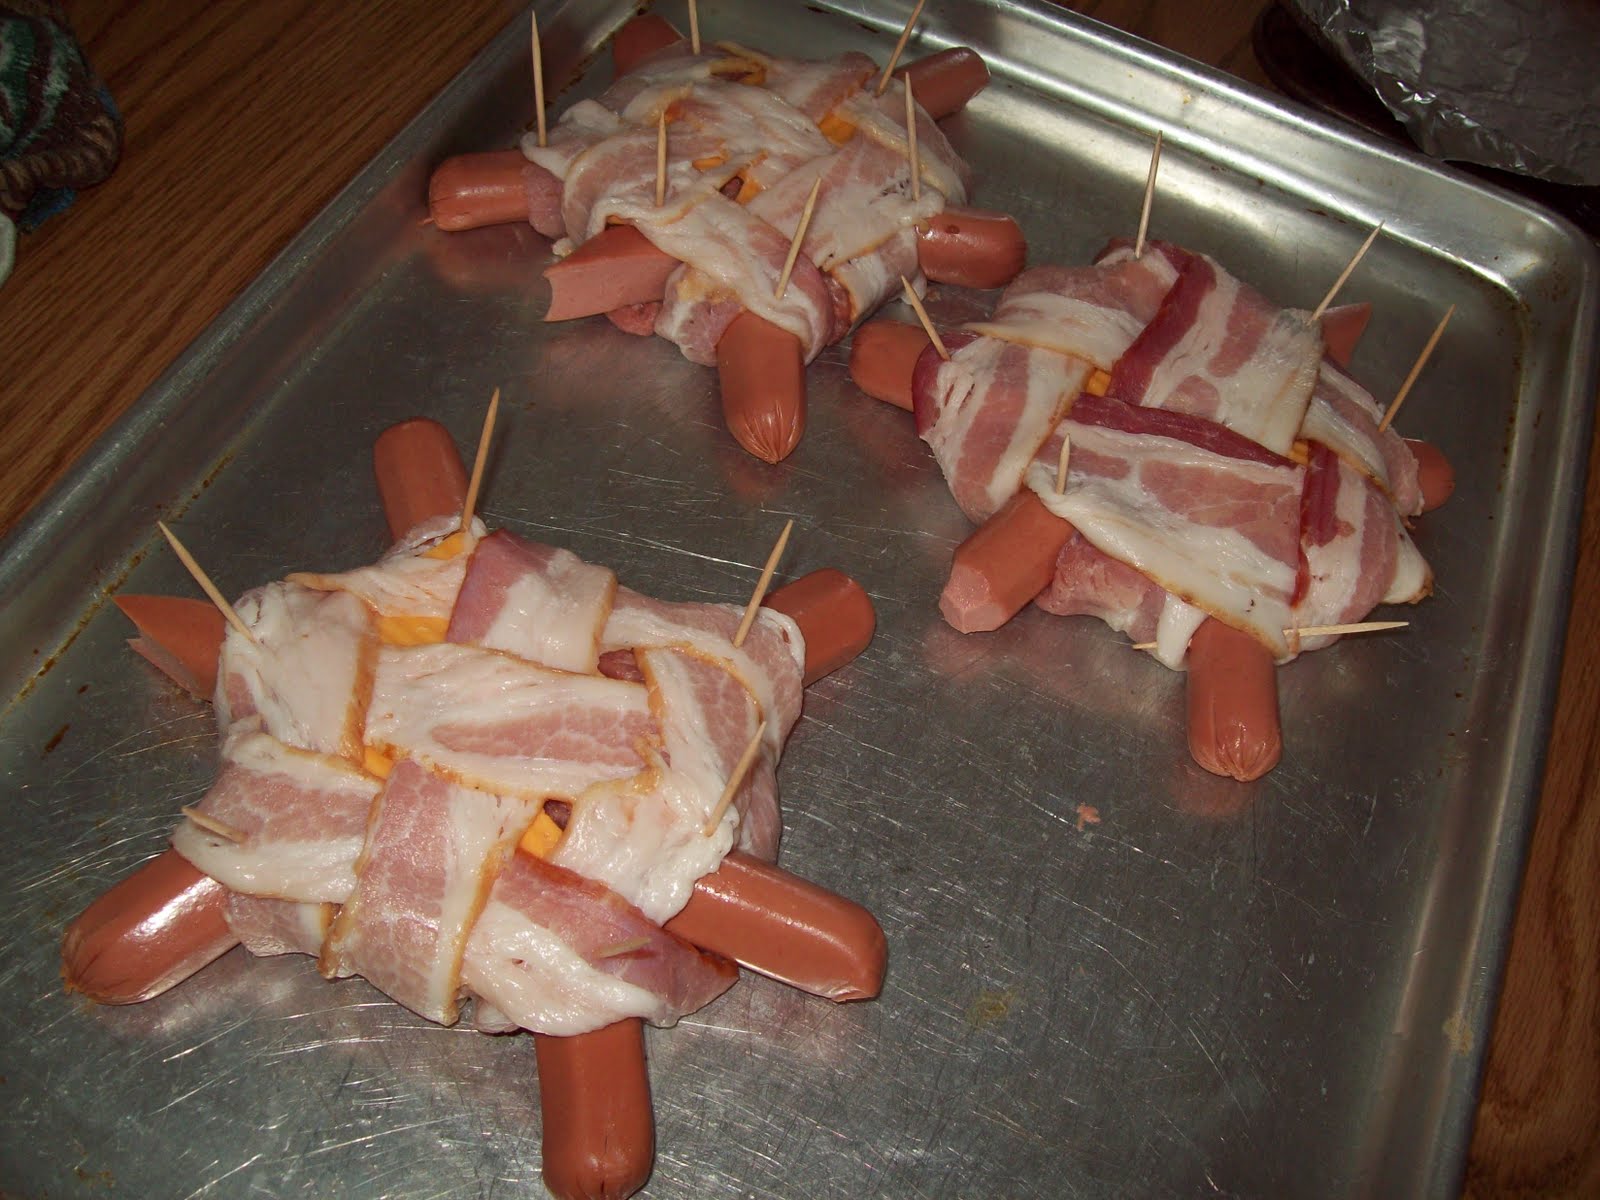
Here are three finished turtles ready for the grill.

I set up the BGE with lump charcoal & fired it up. When ashed over I assembled the EGG & loaded the burgers. I ran the Egg at 350 degrees for 45 minutes finishing the burgers at 165 degrees internal temp. Here we are fresh off the Egg.

Add lettuce, tomatoes, ketchup, mustard, mayo or whatever you like and dig in.
Neat looking treat and tasty too. For an extra juicy burger make your patties with half hamburger and half pork sausage. As you can see some of my Turtle Burgers toes fanned out a little too much so make smaller toes next time. All in all not a real difficult burger. I made the 50/50 pork & hamburger patties which was juicy and tasty. Different from a regular ole burger. Kids love the novel idea too.

Thanks for reading about my latest adventure in outdoor cooking.

Thursday, April 1, 2010

Big Green Egg

Hello all you busy bloggers...
Last weekend i decided to purchase a medium sized Big Green Egg (BGE). This is a smoker/grill i have wanted for some time now due to its reputation as being a very efficient cooker. Saturday morning i went to Smok`n Buddies Grills & Gear here in Norfolk Ne. & looked over a few of them i decided on the medium one. I feel this would work out perfect for the wife & i. The kids are all grown up & gone so most meals its just me & the misses. If i need the extra room i can always fire up one of my other smokers or grill`s.

Here is the little dude, all 95 pounds of it.
Come to find out there was a sale on the BGE`s this month promoting there product for a upcoming Egg Fest next month. Package deal consisting of the Egg, the nest it sit`s in, side shelf`s, plate setter for indirect cooking, grate gripper tool, ash scrapper tool, a box of fire starters and a big ole bag of Big Green Egg lump charcoal all for a little over $800 dollars. Now i know what your all thinking... "that's not much of a sale" Let me tell ya once you fire this thing up and get to cooking you`ll wish ya spent more money & bought a bigger one. Yes... they cook that well. Easy to start up, holds the heat very well, recovers from opening the lid very fast & a very efficient smoker/grill. The food cooked on a BGE is moist and tender also.
After un-loading the cooker and some assembly, i load it up with some lump charcoal and a few chunks of apple & hickory wood. I fired up 3/4th a charcoal chimney of lump charcoal. Once that was ashed over and hot i dumped it in and closed the lid. While the cooker was coming up to temp i went inside to prep the meat.
First to go on was wings... got to have some wings! 14 wing sections all cleaned up & rinsed off.

I decided to try some of John Henry`s Apple Chipotle Rub. I was told its great on wings. Nice flavor with a bit of Chipotle kick.

Here we are all rubbed & happy ready for the smoker.

I also thought a Beef Chuck Roast would be good too. So i rubbed it down with some Dizzy Pig Cow Lick Steak Rub. A spicy beef rub, good on all cuts of beef.

Rubbed and ready.

Here we are all loaded up. A tight fit but a comfortable one. Plenty of room for a meal.

I adjusted the bottom vent to just slightly open, & the same for the top vent and watched it climb up from 200 degrees to where it settled at 275 degrees, perfect for getting the wing skin crispy.


After two hours it was time to take the Wings off and sample one or three. Wow was these wings good, a little bit of a kick from the Chipotle and a nice flavor from the smoke wood. Defiantly worth the wait, crispy skin and very moist. My kind of snack food.

Now its time for a "BBQ nap" while we wait for the Chuck Roast to finish. This took another five hours to cook for a total of seven hours to tender beefy goodness.
After my little nap, which took an hour or so... i went out and checked on the cooker and it was still setting right where i left it holding steady at 275 degrees. Very impressive, any little adjustment to the vents and the cooker would either rise or lower in temps.
Chuck Roast`s on the smoker need to cook to an internal temp of 200 to be fall apart tender. After a close eye on it and a hungry feeling i just couldn't wait any longer so i pulled it off the cooker at 185 internal and let it rest wrapped in foil and a towel to keep it warm.

While the meat rested for a spell i whipped up some Corn Bread muffins, Mexi-corn & Texas Style Ranch Beans. I opened up the roast & sliced up it. Warmed up the rest of the Wings for an appetizer to get my taste buds fired up. What a great meal all the food was perfect. The Roast was tender & juicy, the Wings had a nice kick with bite through skin. The Beans, Corn & Corn Bread made this meal a nice Texas Style treat.
Here is the finished plated meal.

For a first cook on this smoker/grill i am very impressed. This thing worked like a champ. Cooks great, easy to use, great bar-b-que flavor from the Big Green Egg lump charcoal & wood for smoke. Not the cheapest cooker but well worth the money. This thing is made out of thick ceramic so it will hold the heat & look great on the deck for years to come. You can also bake pizza & bread with it. The Dealer(Doug Ashmore) from Smok`n Buddies told me the BGE can dial up to 750 degrees for self cleaning & 400-450 degrees for grilling steaks. That should put a super sear on a Ribeye let me tell ya! So if your looking for a new cooker that can smoke/grill or baking, then check out a Big Green Egg. Once you have cooked on one you`ll wonder why you haven`t bought a BGE sooner.

Saturday, March 13, 2010

Mini - Smoker Build

Here is a project that i`m sure almost anyone with the slightest bit of "handy man" in them can handle. As you have read in previous posts about the cookers i have and use, the 18 1/2 inch Weber Smokey Mountain smoker is my cooker of choice. I also read & post messages on a few of the bar-b-que forums on the internet. While surfing these forums i came across a topic about making a mini smoker out of a Weber Smokey Joe charcoal grill. I just had to have a mini so i went out & bought a WSJ grill and commenced to build me one of these cute little smokers.
First off... if you don`t have a WSJ get ya one & assemble it according to the manufacturers directions.


The next thing i did was to make a charcoal basket out of the original charcoal grate. This however is not completely necessary if you do not have a welder or any welding skills, just skip to the next step. I had a piece of leftover expanded metal from another project so i cut a strip 3 inches tall by 34 inches long & bent it into a ring and tack welded it to the grate. What this basket does is gather up the charcoal a bit to allow a slower more controlled burn.


Next step was to go to the hardware store (Lowe`s, Menard's etc.) and purchase the bolts to hang the grates and a heat sink/defuser which is 11x4 inch deep dog dish. The bolts & nuts for the top grate are 6-32 x 1/2 inch. These bolts do not have to be very long to support the 14 inch grate that came with the grill. The bolts for the second grate are 10-24 x 2 inch which are longer to support the bowl and grate. The second grate was also purchased at the hardware store. It is a 13 1/2 inch replacement charcoal grate for a 18 1/2 inch Weber grill.
For the center section or body of the smoke i purchased a IMUSA 32 Qt. Tamale & Seafood Steamer pot from good ole walmart. This pot can also be ordered on-line.


First you will need to cut out the bottom of the pot. Measure 3/4 inch in from the side of the pot and mark a circle around the bottom on the outside of the pot. I cut the hole with a common jig saw with a metal cutting blade installed. The steamer pot is made from heavy gauge aluminum, but cut`s very easy being careful to not damage the pot while cutting.

Next step. Drill the holes and install the bolts. The longer ones first. Measure down from the top of the pot and mark it at 9 inches down. Three spots evenly spaced around the body. Drill the holes so as the bolts just fit. Add washers on both sides of the pot for added strength. Next measure down 3 1/2 inch from the top of the pot mark & drill those holes. Install the bolts, washers and nuts, tighten all six.

After cutting the bottom out & installing the bolts about all that is left is to install the grates. The next set of pictures show`s how to assemble the bowl & grates.


UPDATE
If using the Dog Dish raise & mark the bottom grate 2 inches higher or do what i did & get a 12 inch Terracotta pot saucer or base & use that in place of the dog dish, then you do not have to make any other modification to this build. Current dimension did not allow for enough space for the dog dish to clear the coals. Also if cooking larger cut`s of meat keep an eye out for the amount of grease in the saucer so it does not spill over and catch fire. For cooking chicken, ribs or appetizers such as the ABT`s i do not see any other problems with this cooker build.


Place the water bowl on the longer bolts, add the 13 1/2 inch replacement grate directly on the bowl that rests on the long bolts. Place the larger 14 inch grate on the shorter top bolts. Set the body on the bottom section of the grill, top it off with the lid and you have yourself an Mini Weber Smokey Mountain smoker that operates as easy & burns as clean as its bigger brother.


One other thing i did was to install a 4 inch long bolt attached to the bottom grill vent to make adjusting the air flow a little easier. Those of you who have or have used a small grill like this one will know that the bottom vent does get a little hot while cooking so the long bolt will save you from a nasty burn to the finger tips.


Well there ya have it, a nice little smoker you built yourself from a bunch of common products one can find at the hardware store. They tell me that its possible to get a long burn time of at least 7 hours without refueling. That means it can smoke/cook a rack or two of ribs cut to fit, a pork loin, whole chickens & pieces... the list goes on. Although you can not cook for a large crowd but you can feed up to or maybe more than 7 - 10 hungry bar-b-que nuts like myself.
Well lets add up the cost of this build if you bought all the parts;
Grill- $29.95
Steamer pot- $24.97
Terracotta saucer- $3.00
Replacement grate- $8.99
Misc bolts and nuts- $2.67
For a grand total of $69.58 you can build a nice little smoker that takes up very little space in the yard & travels very well also. Take it apart & pack it in the trunk or back of your pick-up truck or RV. It measures approximately 28 inches tall by 18 inches wide at the steamer pot handles. If you are smoking a larger cut of meat like a Boston butt pork roast for southern style pulled pork you will have to refuel it at least once but this is super easy to do, just pick up the center section by the handles with glove covered hands & add some more charcoal & continue cooking. This has to be the neatest thing i have found yet! Super stoked! Look for my next post... if the weather permits i will fire-up this little bad boy and cook some bar-b-que!
Have fun with it & make your neighbors jealous! Ya know there watching!

Saturday, March 6, 2010

Todays Menu: RIB-LETS

Today i finally had a chance to fire up one of my Weber Smokey Mountain smokers. The weather was in the high 30`s, cloudy and misty all afternoon. Good cooking weather for ducks. A few days ago i went to the grocery store and purchased 10 pounds of Farmland Rib-lets for $11.90 a box. Thawed in the fridge for 3 days at a chilly 35 degrees.

Once thawed, Friday evening i mixed up a simple brine of 1/2 cup of Kosher salt, 1/2 cup of Sugar, to one gallon of water. In went the rib-lets for a swim in the fridge for 8 hours. Place the riblets in a non reactive container, cover with enough brine to submerge the riblets and your set.

Saturday morning i removed them from the fridge, rinsed with cold water to remove the brine, pan dry and gave them a good dusting with my pork dry rub. Bagged them up and back in the fridge for a few hours.

Once i had the WSM fired up and temps at 250 degrees at the grate level. I loaded up half the riblets for today and tomorrow i will cook the rest. All brined, seasoned and ready to cook. I added six small chunks of apple wood when i filled the charcoal ring on the WSM so it will give me a consistence whiff of thin blue smoke for the entire cook time.


After 2 1/2 hours at 250 i gave the riblets their first layer of my homemade Bar-B-Que Sauce. Its a fairly thin Tomato & Vinegar based sauce. Sweet, tangy, light on the heat. I originally came up with this sauce for pulled pork liked it so much i modified it for ribs by making it sweeter.


I brushed on the sauce two different times about 15-20 minutes apart. Nice layer of sauce but not a drippy mess. My style of Bar-B-Que consists of layers of flavor. Lightly seasoned & sauced... i want to be able to tell i`m eating meat not just dry rub & sauce. The worst thing one can do is to over sauce your bar-b-que. Old time pit masters will tell ya not to hide the flavor with a thick layer of sauce, i feel the same is true today. Check out the beautiful color on these riblets. This is what you want in a rib of any type. Nice color that looks as good as it tastes.

Fire up those smokers & grills spring is just around the corner!

Tuesday, March 2, 2010

Shameless Plug


Well folks with the catering & concession season approaching fast i think its about time to share my dry rub knowledge with ya all, as limited as it my be.
A dry rub is a spice mix used to season or marinate beef, pork, poultry or even vegetables & in my case for the smoker or grill. In my opinion a rub for the smoker should contain a mix in the ratio of 8 parts sugars, 3 parts salts, 1 part color; such as paprika or chili powder and 1 part "other stuff".
OK... now your wondering whats the "other stuff". That`s where the "secret recipe" part comes in. The last remaining 1 part of ingredients can be what ever spices you like such as; cayenne pepper, black pepper, onion &/or garlic powder, cumin, oregano, thyme, coriander... you get the picture.
With foods of the South, a dry rub is often used on grilled or barbqued meats. Dry rubbed ribs, pulled pork, brisket and chicken are also given flavor through a spice rub. The most typical Southern style spice rubs include chili and cayenne pepper, garlic and onion powder, salt and black pepper, paprika and dry mustard. Although the quantities of hot ingredients can be adjusted, this is an extremely spicy mix and adds a powerful kick to meat.
I like to use a dry rub that has a sweetness level a bit higher than your typical southern rub. The use of brown sugar or raw sugars will caramelize over a period of time. When the right amount of smoke/heat is applied a bark or crust will form on the meat that is extremely flavorful.
If you ever happen to be in Norfolk Nebraska during the spring through the fall of the year, stop by our Saturday Farmers Market held at the Sunset Plaza Mall park lot between the hours of 10am - 12am. Purchase a bottle or three of my spice rubs. Purchase price is $5.00 a bottle. Purdy dang good stuff if i must say so myself.

Saturday, January 23, 2010

Jambalaya

It`s a good day for some Jambalaya cold, wet & raining. This is how i use leftover smoked sausage(brats) & chicken. You can also add shrimp if you like. The heat level is pretty mild in my recipe so if you like it hotter add some Tabasco sauce or a teaspoon or three of Cayenne Pepper powder.

Start with a Trinity of diced celery, green peppers & onion.


Star of the show leftover brats & chicken thigh`s. Might add some shrimp, might not.


This shot is right before the rice. Everyone`s all bubbly & happy. Thought i heard it say... "Gimme some a dat rice ole boy"


Here it is served with a slice of garlic french bread.

Who Boy Dats Good!!!

I am sure as heck no Cajun... born & raised in middle of corn country, sure is hot, wish it would rain... Nebraska. But i must admit this recipe is pretty good and really not too hard to make. Use up some leftover smoked or grilled meat & give it a whirl. Or grill up some extra fix`in and follow the recipe. With all that good stuff in the pot it`s sure to be a family favorite!
Here we go....

Jambalaya

Ingredients:
6-boneless chicken thighs, cut up
2-pounds smoked sausage, cut up
¼-cup light olive oil
6-cups *Trinity
Onion
Green Peppers
Celery
*The important thing about the “Trinity” of celery, onion and bell pepper is not exact measurements. Rather, it is that the amounts of each should be nearly equal to one another. It is the balance of flavor that counts. Two cups diced of each vegetable is a good start.
5-cups water
6-cloves garlic, chopped
1-6 ounce can tomato paste
1-14 ounce can tomatoes
1-tablespoon Cajun or Creole seasoning (i use Tony Chachere’s)
2-tablespoon Worcestershire sauce
1-cup uncooked rice
3-bay leaves
Salt and pepper to taste

Cooking:
In a large skillet, brown chicken and sausage quickly in 2 tablespoons olive oil, then add water and poach until tender. Reserve liquid. Sauté chopped onion, garlic, and bell peppers in remaining olive oil. Add cut up chicken and sausage, tomatoes and tomato paste. Stir in seasonings to taste. Simmer for 40 minutes on low heat. Add rice along with 2-1/2 cups of reserved liquid. Cook covered until rice is tender. Do not let the rice stick to bottom of the pot.

My twist on Jambalaya is to use up leftover smoked or grilled meat. For more flavor use smoked or grilled chicken & brats. This may not be authentic Jambalaya… but its pretty dang good!

Saturday, January 16, 2010

Jeff`s Jerky

Today i made some jerky in my electric smoker(MES) that turned out great!
Last night i cut up a hunk of Beef Round Rump Roast weighing 1.85lbs. Trimmed out all the fat and shinny silver skin that the butcher might have left on. After trimming i sliced the roast into 1/8th - 1/4 inch slices & cut those slices into 1 inch strips. After trimming i ended up with a little over a pound of jerky meat.
Next i mixed up a flavored cure.....

Ingredients:
1 Lb Jerky Meat
1 Tbs Tender Quick(meat cure)
3 Tbs Soy Sauce
1 Tbs Worcestershire Sauce
½ Tsp Onion Powder
½ Tsp Garlic Powder
¼ Tsp Ginger Powder
¼ Tsp Chinese Five Spice Powder
¼ Cup Water

Directions:
Trim meat of all fat & sliver skin.
Cut jerky meat into 1-inch wide strips, 1/8 to 1/4 inch thick.
Mix ingredients in a cup or small bowl. Whisk ingredients
together thoroughly. Place meat in larger plastic bag pour
cure over meat. Toss meat around in bag to thoroughly mix.
Marinate 6-8 hours. Rinse the meat well. Dry meat in a smoker at 180-200 degrees to desired consistency adding wood chips of your choice as needed. When done the meat should be dry but flexible.


I marinated/cured the meat overnight. This morning i rinsed the meat well and seasoned the jerky meat with Dizzy Pigs brand Cow Lick Steak Rub. I heated the smoker up at 180 degrees, loaded a little over a pound of cured & seasoned jerky. My wood chips of choice today is a 50/50 mix of Apple & Hickory. This will product a sweet & smokey flavor!
I left the heat at 180 for the first hour. Then bumped the heat to 200 for the remainder of the cook time. When the color & texture was to my liking i unload the jerky & i will bag it up in snack sized portions.

Here is a sample plate of the finished Jerky...

Whip ya up a batch of Jeff`s Jerky. I`m sure you will love it! Way better than any you can purchase & cheaper too! This Jerky can be made in a dehydrator or oven also but best done in a smoker. Yum Yummm!